반응형

반응형
#import <UIKit/UIKit.h>

@interface UIColor (Helper)
+ (UIColor *)colorWithRGBA:(NSUInteger)color;
@end


#import "UIColor+Helper.h" @implementation UIColor (Helper) + (UIColor *)colorWithRGBA:(NSUInteger)color { return [UIColor colorWithRed:((color >> 24) & 0xFF) / 255.0f green:((color >> 16) & 0xFF) / 255.0f blue:((color >> 8) & 0xFF) / 255.0f alpha:((color) & 0xFF) / 255.0f]; } @end


반응형

'IPHONE' 카테고리의 다른 글

Creating a Glow Effect for UILabel and UIButton  (0) 2013.11.05
scrollView 코드로 이동하기.  (0) 2013.10.25
ios Localization.  (0) 2013.10.11
@property의 어트리뷰트 설정.  (0) 2013.10.08
XCode4 단축키.  (0) 2013.09.12
Posted by 컴스터
,

ios Localization.

IPHONE 2013. 10. 11. 11:48
반응형

iOS Localization Tutorial: Localize Your Apps to Support Multiple Languages

Editor’s note: This week let’s talk about localization. In brief, localization is a process to adapt a product to a particular language. Not all iPhone users can read or write English. If you just release your app in English, it may be ignored by user from other parts of the world. In this tutorial, Ziad will go through the localization process with you. You’ll see how easy you can localize an app and make it available in multiple languages by using the built-in function of Xcode and iOS API.

Enter the iOS localization tutorial.

The iOS devices including iPhone and iPad are available globally. Obviously, iOS users are from different countries and speak different languages. To deliver a great user experience, you may want to make your app available in multiple languages. The process of adapting an app to support a particular language is usually known as localization.

Xcode has the built-in support of localization. So it’s fairly easy for developer to internationalize an app through the localization feature and some API calls.

Localization Feature Photo

Some people think of localization as the same process of translation. That’s partially correct. Translating static or visible text is just part of the localization process. Localization involves other elements such as images, graphics and sound. You’ll also need to handle the different display format of numeric values, as well as, date and time.

In this tutorial, we’ll show you the step-by-step on how to localize the storyboard file, strings, images and app name. As usual, we’ll demonstrate the process by building a simple app and make it available in French.

Localization Overview

We are going to create a small application called “Book Store”, which will displays the details of a book with a cover image, title, author and description. The original app is in English. We’ll localize the app together and make it available in French. So at the end of the tutorial, you’ll have an app that supports two localizations: English and French.
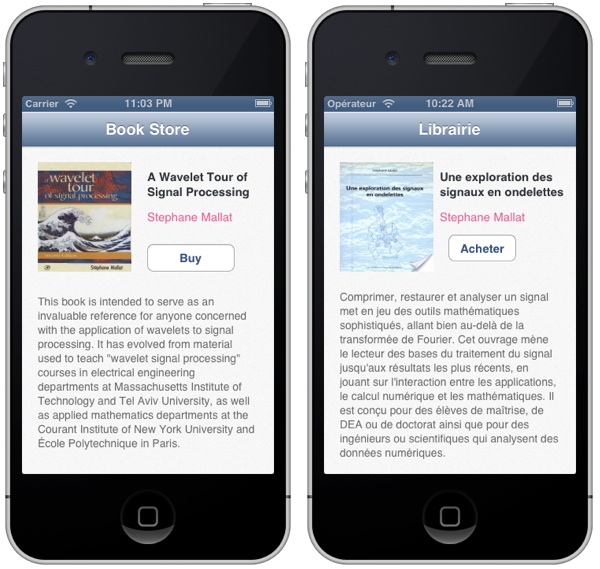
BookStore App English and French

To make the app available in French, we’ll demonstrate how to localize:

  • the text in the storyboards
  • the cover image
  • the dynamic message displayed by code
  • the name of the app as displayed in home screen

For those of you who don’t know how an app selects a localization, it refers to the language settings of iOS (General > International > Language). An app uses this preference as the key for accessing the localized resources for the requested language.

Note: To make the tutorial as simple as possible, the app do not have any functionalities and the book data is static. Also, please note you’ll need to use Xcode v4.6 or up.

Getting Started

It’s time to set up the project by creating a new project based on the Single View Application iOS app template. In the project options, you’ll need to check the storyboard and Automatic Reference Counting Boxes. This app will provide only iPhone Views, so choose iPhone for the device family and save the project. Open the Storyboard, design the user interface as shown below:
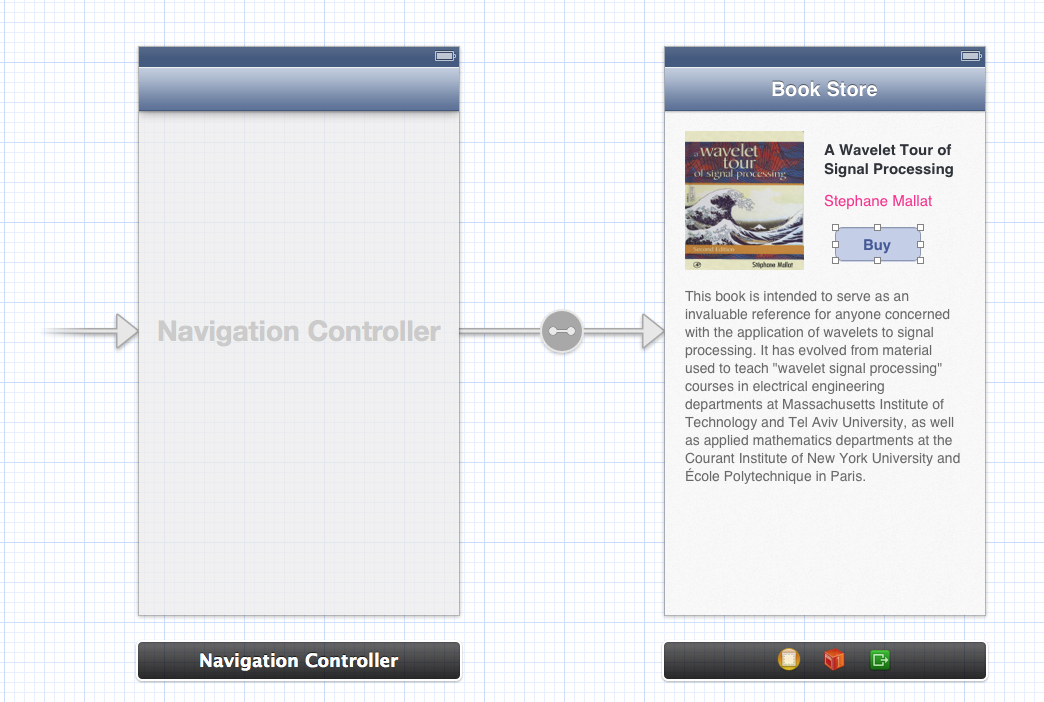
Screen Shot 2013-09-10 at 12.17.54 PM

Storyboards of BookStore

The focus of this tutorial is on Localization. So to save you time from setting up the project, you can download this project template to start with. The template already pre-built the user interface.

Tip: If you have no idea about how to work with storyboard, check out our tutorials in the free iOS course.

Localizing the Storyboard

Now, let’s start to localize the project. In Xcode, click on Book Store in the project navigator and select the Info tab of the project. Look for the localizations section in the Info tab. Apparently, it shows a single localization: English. Check the “Use Base Internalization” checkbox.
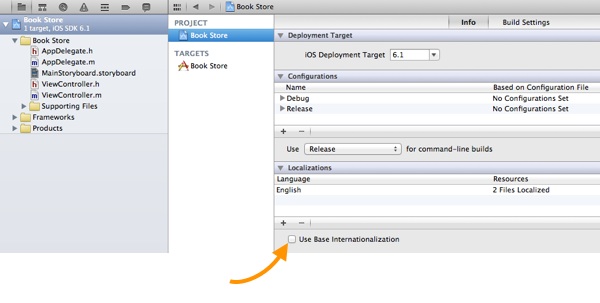
Enable Use Base Internationalization

You’ll then be prompted to select the storyboard to use for the base internationalization.
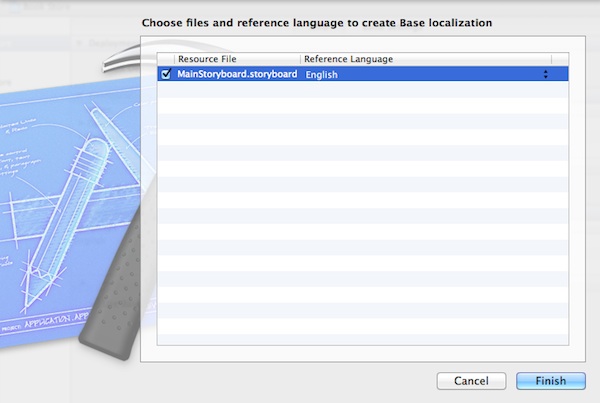
Enable Use Base Internationalization Prompt

Make sure that MainStoryboard.storyboard is selected and that the reference language is English. Click the Finish button.

What we just did is to create a base storyboard. The concept of base internationalization was first introduced in Xcode 4.5. An app has just one set of storyboards that is localized to the default language. These storyboards is known as the base internationalization. Later when we create a localization, Xcode automatically generates a strings file containing all the text in the base storyboard.

Why Base Internationalization?
Before Xcode 4.5, there is no such concept of base internationalization. Xcode replicates the whole set of storyboards for each localization. Say, your app is localized into 5 languages. Xcode generates 5 sets of storyboards for localization purpose. There is a major drawback for this localization process. When you need to add a new UI element in the storyboards, you’ll need to add the same element for each localization. That’s a tedious process. This is the reason why Apple introduced base internationalization in Xcode 4.5.

With the base storyboard configured, it’s now ready to add a localization for French. First, select the view controller in Storyboard. Then switch back to the project info. Click the + button at the bottom of the Localizations section and choose French from the popup list.
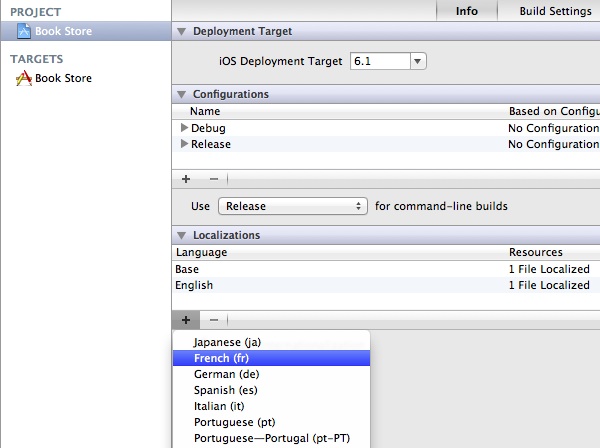
Add French Localization

Adding a new localization

Next, you’ll be asked to choose the resource files and language for creating the French localization. You can refer to the below screenshot for the selected options. Leave all the files checked and click Finish.
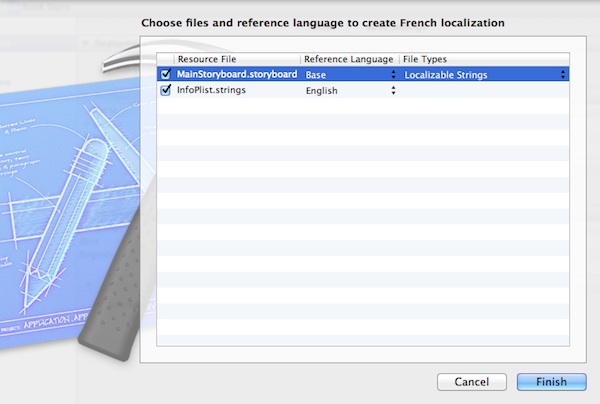
Adding localization

Once done, you should notice in the project navigator that there is now a triangle symbol next to the MainStoryboard.storyboard. Expand it and you’ll find both the base storyboard and a strings file of the storyboard in French.
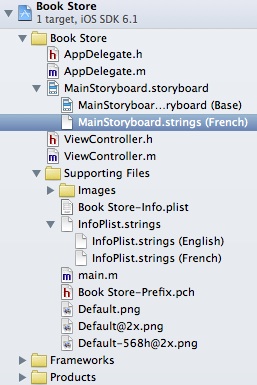
French Localization Files

Select the french strings file (i.e. MainStoryboard.strings (French)) and you should find a list of strings in key/value pairs:

1
2
3
4
5
6
7
8
9
10
11
12
13
14
/* Class = "IBUILabel"; text = "Stephane Mallat"; ObjectID = "0N3-up-Ts6"; */
"0N3-up-Ts6.text" = "Stephane Mallat";

/* Class = "IBUINavigationItem"; title = "Book Store"; ObjectID = "9EY-vY-nyh"; */
"9EY-vY-nyh.title" = "Book Store";

/* Class = "IBUILabel"; text = "This book is intended to serve as an invaluable reference for anyone concerned with the application of wavelets to signal processing. It has evolved from material used to teach \"wavelet signal processing\" courses in electrical engineering departments at Massachusetts Institute of Technology and Tel Aviv University, as well as applied mathematics departments at the Courant Institute of New York University and École Polytechnique in Paris. "; ObjectID = "gkh-KY-W1e"; */
"gkh-KY-W1e.text" = "This book is intended to serve as an invaluable reference for anyone concerned with the application of wavelets to signal processing. It has evolved from material used to teach \"wavelet signal processing\" courses in electrical engineering departments at Massachusetts Institute of Technology and Tel Aviv University, as well as applied mathematics departments at the Courant Institute of New York University and École Polytechnique in Paris. ";

/* Class = "IBUIButton"; normalTitle = "Buy"; ObjectID = "jul-3l-6x7"; */
"jul-3l-6x7.normalTitle" = "Buy";

/* Class = "IBUILabel"; text = "A Wavelet Tour of Signal Processing"; ObjectID = "xi7-zh-v4N"; */
"xi7-zh-v4N.text" = "A Wavelet Tour of Signal Processing";

When we add a new localization, Xcode scans through the base storyboard, extracts those textual items to be localized and put them into the strings file. As you can see above, the visible strings of storyboards such as label, title of the navigation bar and button title are put into the strings file. All entries are in key/value pairs. The first part of key is the object ID of the UI item. You can find the object ID of the UI object under Identity Inspector. For instance, the object ID of the Buy button is shown here:

Object ID in Identity Inspector

With the strings file generated, your job is to translate all the values into French. The contents of the MainStoryboard.strings file for the French localization will look like this:

1
2
3
4
5
6
7
8
9
10
11
12
13
14
/* Class = "IBUILabel"; text = "Stephane Mallat"; ObjectID = "0N3-up-Ts6"; */
"0N3-up-Ts6.text" = "Stephane Mallat";

/* Class = "IBUINavigationItem"; title = "Book Store"; ObjectID = "9EY-vY-nyh"; */
"9EY-vY-nyh.title" = "Librairie";

/* Class = "IBUILabel"; text = "This book is intended to serve as an invaluable reference for anyone concerned with the application of wavelets to signal processing. It has evolved from material used to teach \"wavelet signal processing\" courses in electrical engineering departments at Massachusetts Institute of Technology and Tel Aviv University, as well as applied mathematics departments at the Courant Institute of New York University and École Polytechnique in Paris. "; ObjectID = "gkh-KY-W1e"; */
"gkh-KY-W1e.text" = "Comprimer, restaurer et analyser un signal met en jeu des outils mathématiques sophistiqués, allant bien au-delà de la transformée de Fourier. Cet ouvrage mène le lecteur des bases du traitement du signal jusqu'aux résultats les plus récents, en jouant sur l'interaction entre les applications, le calcul numérique et les mathématiques. Il est conçu pour des élèves de maîtrise, de DEA ou de doctorat ainsi que pour des ingénieurs ou scientifiques qui analysent des données numériques.";

/* Class = "IBUIButton"; normalTitle = "Buy"; ObjectID = "jul-3l-6x7"; */
"jul-3l-6x7.normalTitle" = "Acheter";

/* Class = "IBUILabel"; text = "A Wavelet Tour of Signal Processing"; ObjectID = "xi7-zh-v4N"; */
"xi7-zh-v4N.text" = "Une exploration des signaux en ondelettes";

Localizing Image

It’s very easy to localize image using Xcode. As a demo, we will localize the cover image. Select the “cover.jpeg” in the project navigator. Next, bring up the file inspector, and locate the localization section, in which you’ll see a button named “Localize…”. Click the button and you’ll be prompted for confirmation. Choose English and click the “Localize” button to confirm.
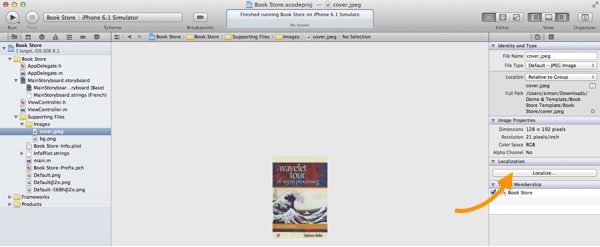
Localizing Cover Image

Localizing Cover Image

After that, you’ll see the French option in the localization section. Select the “French” localization and you’ll find two versions of cover.jpeg.
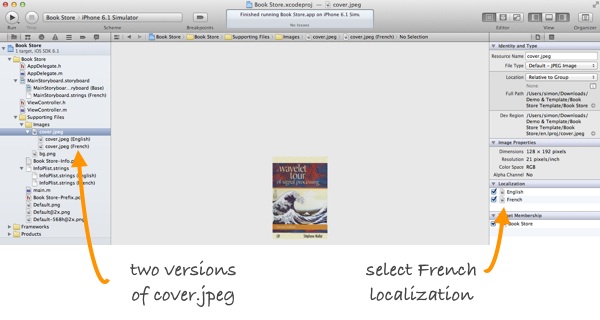
Adding French Localization for Image

Adding French Localization for Image

Switch back to the finder and local the project directory. You’ll find two folders: en.lproj and fr.lproj. Both folders are automatically generated by Xcode for localization. The en.lproj folder stores resource files for English localization, while fr.lproj folder is for French localization. If you look into both folders, each one contains the cover.jpeg file. Download the French version of the cover image from here (or use whatever image you like). Copy the cover image just downloaded and replace the one in fr.lproj folder.

Now it’s time to test out the app. If you’ve got everything right, here are what you’ll see in English and French.

BookStore App English and French

Tip: To change the language in iPhone Simulator, click home button. Select Settings > General > Language and select French.

Localizing Dynamic Strings

So far we just demonstrated the localization of static items. But in many places in applications, you create NSString instances dynamically or display string literals to the user. These strings will also need to be localized in a localized application.

To demo how to localize text displayed by code, I’ve added a few lines of code for the “Buy” action:

1
2
3
4
5
6
7
8
- (IBAction)buy:(id)sender
{
    [[[UIAlertView alloc] initWithTitle:@"Confirmation"
                                message:NSLocalizedString(@"BOOK_PURCHASE", @"Message")
                               delegate:nil
                      cancelButtonTitle:@"OK"
                      otherButtonTitles:nil] show];
}

The code is simple. It just shows up an alert displaying the “Thanks for Your Purchase!” message. But instead of using a hardcoded message, we use the NSLocalizedString macro to get the string. The NSLocalizedString macro fetches a localized string from the Localizable.strings file for the current localization. It takes two arguments: a key and a comment. At runtime, the macro returns the value for the key in the localization that corresponds to the user’s preferred language. The comment is for your own reference only.

If you run the app and tap the Buy button, you’ll only see an alert view with “BOOK_PURCHASE” message as we haven’t created the Localizable.strings file. This is the default file for storing localized strings that are used by code.

Now let’s create the Localizable.strings file. In the project navigator, create a new file under the Supporting Files folder. Select the Strings file template and click the Next button.
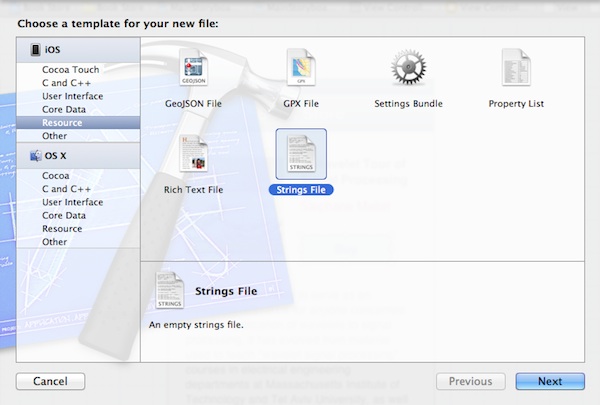
New File Strings Template

When prompted, save the file as Localizable.strings. Next, we’ll use the similar procedures to localize the file. Select the Localizable.strings and click the “Localize…” button in the File Inspector.
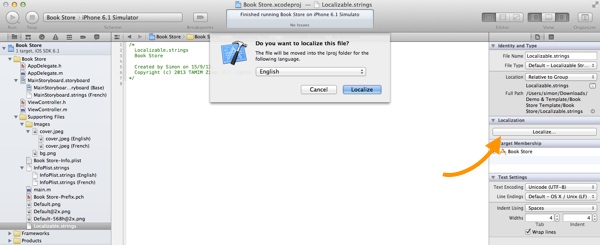
Localize Localizable Strings

When the confirmation dialog appears, make sure that English is selected and then click the Localize button. Next, select the French checkbox to add a Localizable.strings file to the French localization. If you’ve got everything correct, you should have two version of Localizable.strings file.
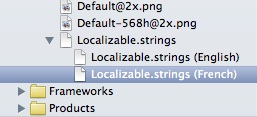
Localizable String French Version

Localizable.strings File in English and French

Put the following message in the English version of Localizable.strings file:

1
"BOOK_PURCHASE" = "Thanks for the Purchase!";

Translate the message and put it in the French version of Localizable.strings file:

1
"BOOK_PURCHASE" = "merci pour l'achat!";

You’re done. Compile and run the app again. Depending on the language setting, you should get different alert message when tapping the Buy button.
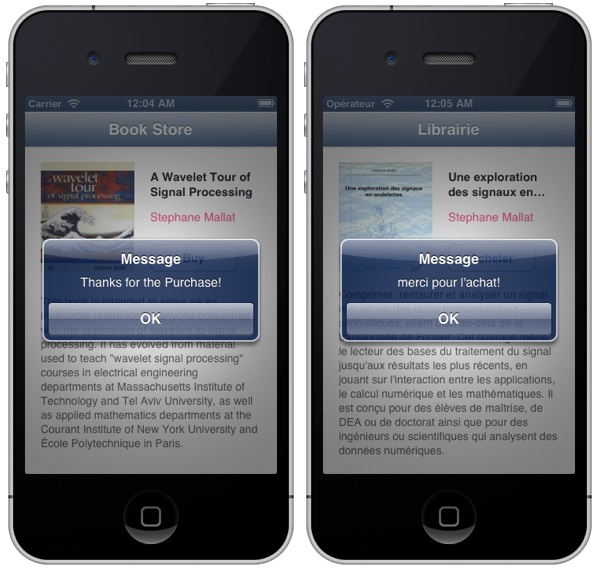
Alert Message Localization

Localizing the App Name

In some cases, you may also want to localize the app name. When we create the French localization, Xcode already generates the French version of InfoPlist.strings. You can put key/value pairs in the InfoPlist.string file to override the values stored in Info.plist file.

So to display a different app name in the French version, simply add the following string in the InfoPlist.string (French) file:

1
"CFBundleDisplayName" = "Librairie";

This will change the name of app as appeared on the springboard. Compile and run the app again to test it out.
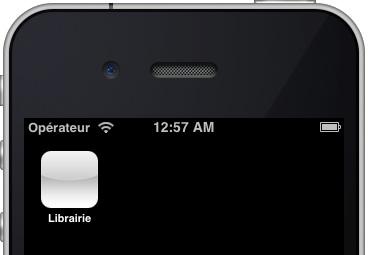
Changing App Name

App Name in French

Tip: Try to clean the build and reset the iPhone Simulator if the app name doesn’t change.

Summary

In this tutorial, we covered the localization process in iOS programming. Now you should have a basic idea of localizing an iPhone app.

For your complete reference, you can download the source code of the Xcode project from here. Please remember that the project should be run on Xcode 4.6 or up.

As always, please leave us comment and share your thought about the tutorial.

반응형

'IPHONE' 카테고리의 다른 글

scrollView 코드로 이동하기.  (0) 2013.10.25
UIColor 유용한 카테고리.  (0) 2013.10.17
@property의 어트리뷰트 설정.  (0) 2013.10.08
XCode4 단축키.  (0) 2013.09.12
아카이브에 저장하고 불러 오기 샘플 코드.  (0) 2013.09.04
Posted by 컴스터
,
반응형

프라퍼티의 어트리뷰트에는 3종류의 값을 설정할 수 있다.

먼저, setter의 동작방식이 있다. 프라퍼티가 최종적으로 넘겨진 매개변수를 가지는 방식이다.


assign은 넘어온 값을 그대로 가진다. 주로 int, float이나 BOOL 같은 스칼라값을 다루는 프라터티가 assign방식을 사용한다.


retain은 넘어온 오브젝트의 리테인 카운트를 1 증가시켜 보관하며 이전 값은 release된다. 코코아 오브젝트는 대부분 retain방식을 사용하게 된다.


copy는 넘어온 매겨변수를 복사해서 보관하며 이전 값은 release된다. 프로그램의 로직 상 필요한 경우에는 매개변수를 copy를 사용하여 오브젝트를 복사해 사용할 수 있다. 이때 주의할 점은 매개변수로 넘어온오브젝트가 NSCopying프로토콜을 준수하는 오브젝트여야 한다는 것이다. 대부분의 코코아 오브젝트는 NSCopying 프로토콜을 준수하고 있지만 사용자가 만드는 커스텀 클래스나 CoreData의 오브젝트들은 NSCopying프로토콜을 기본적으로 준수하지 않기 때문에 직접 copyWithZone:메소드 구현을 통해 NSCopying 프로토콜을 구현해야 한다.


두번째로 nonatomic이 있다 (atomic 어트리뷰트는 사용하지 않는다).

nonatomic이 보다 리소스를 적게 소모하지만 프라퍼티에 접근하는 모든 메소드들이 쓰레드를 사용하지 않는다는 보장이 있지 않은 이상 기본값인 atomic을 사용하는 것이 좋다.


마지막으로 readwrite와 readonly가 있다.

글자 그대로 읽기만 할 수 있는 프라퍼티와 읽고 쓸 수 있는 프로퍼티를 만드는 설정이다. readonly로 설정되면 setter가 제공되지 않고 getter만 제공된다.

반응형

'IPHONE' 카테고리의 다른 글

UIColor 유용한 카테고리.  (0) 2013.10.17
ios Localization.  (0) 2013.10.11
XCode4 단축키.  (0) 2013.09.12
아카이브에 저장하고 불러 오기 샘플 코드.  (0) 2013.09.04
Local Notification  (0) 2013.07.10
Posted by 컴스터
,

XCode4 단축키.

IPHONE 2013. 9. 12. 09:38
반응형

Menu Command Shortcuts (By Menu)

Each table in this section lists the commands in an Xcode application menu and the keyboard shortcuts associated with each command. Entries appear in the order in which they appear in the menu. The following tables are available:

Table 1-1  Xcode menu command shortcuts

Command

Key Binding

Shortcut

About Xcode


Preferences…

⌘,

Command-,

Hide Xcode

⌘H

Command-H

Hide Others

⌥⌘H

Option-Command-H

Show All


Quit Xcode

⌘Q

Command-Q

Table 1-2  File menu command shortcuts

Command

Key Binding

Shortcut

New Tab

⌘T

Command-T

New Window

⇧⌘T

Shift-Command-T

New File…

⌘N

Command-N

New Target…


New Project…

⇧⌘N

Shift-Command-N

New Workspace

⌃⌘N

Control-Command-N

New Group

⌥⌘N

Option-Command-N

New Group from Selection


Add Files…

⌥⌘A

Option-Command-A

Open…

⌘O

Command-O

Open Quickly…

⇧⌘O

Shift-Command-O

Close Window

⌘W

Command-W

Close All Windows

⌥⌘W

Option-Command-W

Close Tab

⇧⌘W

Shift-Command-W

Close Other Tabs

⌥⇧⌘W

Option-Shift-Command-W

Close Document

⌃⌘W

Control-Command-W

Close Workspace


Save

⌘S

Command-S

Save All

⌥⌘S

Option-Command-S

Save Multiple…

⌥⇧⌘S

Option-Shift-Command-S

Save As…

⇧⌘S

Shift-Command-S

Revert…


Unlock…


Show in Finder


Open with External Editor


Workspace Settings…


Commit…

⌥⌘C

Option-Command-C

Update…

⌥⌘X

Option-Command-X

Update All

⌃⌥⌘X

Control-Option-Command-X

Merge…


Discard Changes…


Add


Ignore


Mark as Resolved


Refresh Status


Show Repository Status


Repositories…


Create Snapshot…

⌃⌘S

Control-Command-S

Page Setup…

⇧⌘P

Shift-Command-P

Print…

⌘P

Command-P

Table 1-3  Edit menu command shortcuts

Command

Key Binding

Shortcut

Undo

⌘Z

Command-Z

Redo

⇧⌘Z

Shift-Command-Z

Cut

⌘X

Command-X

Copy

⌘C

Command-C

Paste

⌘V

Command-V

Paste Special

⌥⌘V

Option-Command-V

Paste and Match Style

⌥⇧⌘V

Option-Shift-Command-V

Duplicate

⌘D

Command-D

Delete


Select All

⌘A

Command-A

Find in Workspace…

⇧⌘F

Shift-Command-F

Find and Replace in Workspace…

⌥⇧⌘F

Option-Shift-Command-F

Find…

⌘F

Command-F

Find and Replace…

⌥⌘F

Option-Command-F

Find Next

⌘G

Command-G

Find Previous

⇧⌘G

Shift-Command-G

Use Selection for Find

⌘E

Command-E

Use Selection for Replace

⇧⌘E

Shift-Command-E

Filter in Navigator

⌥⌘J

Option-Command-J

Filter in Library

⌥⌘L

Option-Command-L

Show Fonts

⌃⇧⌘T

Control-Shift-Command-T

Bold


Italics


Underline


Show Colors


Show Spelling and Grammar

⌘:

Command-:

Check Document Now


Check Spelling While Typing


Check Grammar With Spelling


Correct Spelling Automatically


Show Substitutions


Smart Copy/Paste


Smart Quotes


Smart Dashes


Smart Links


Data Detectors


Text Replacement


Make Upper Case


Make Lower Case


Capitalize


Start Speaking


Stop Speaking


Rename


Extract


Create Superclass


Move Up


Move Down


Encapsulate


Table 1-4  View menu command shortcuts

Command

Key Binding

Shortcut

Project

⌘1

Command-1

Symbol

⌘2

Command-2

Search

⌘3

Command-3

Issue

⌘4

Command-4

Debug

⌘5

Command-5

Breakpoint

⌘6

Command-6

Log

⌘7

Command-7

Show Navigator

⌘0

Command-0

Standard

⌘↩

Command-↩

Assistant

⌥⌘↩

Option-Command-↩

Version

⌥⇧⌘↩

Option-Shift-Command-↩

Show Related Items

⌃1

Control-1

Show Previous History

⌃2

Control-2

Show Previous Files History

⌃⌘2

Control-Command-2

Show Next History

⌃3

Control-3

Show Next Files History

⌃⌘3

Control-Command-3

Show Top Level Items

⌃4

Control-4

Show Group Files

⌃5

Control-5

Show Document Items

⌃6

Control-6

Show Issues

⌃7

Control-7

Add Assistant Editor


Remove Assistant Editor

⌃⇧⌘W

Control-Shift-Command-W

Reset Editor

⌥⇧⌘Z

Option-Shift-Command-Z

Assistant Editors on Right


Assistant Editors on Bottom


Assistant Editors on Left


Assistant Editors on Top


Assistant Editors Stacked Horizontally


Assistant Editors Stacked Vertically


Assistant Editors Stacked Horizontally Right to Left


Assistant Editors Stacked Vertically Bottom to Top


Show Toolbar Bar


Show Tab Bar


Show Debug area

⇧⌘Y

Shift-Command-Y

Table 1-5  Navigate menu command shortcuts

Context

Command

Key Binding

Shortcut


Reveal in Project Navigator

⌘L

Command-L

Open in Adjacent Editor

⌘<

Command-<

Go Forward

⌃⌘⇢

Control-Command-Right Arrow

Go Forward in Alternate Editor

⌃⌥⌘⇢

Control-Option-Command-Right Arrow

Go Back

⌃⌘⇠

Control-Command-Left Arrow

Go Back in Alternate Editor

⌃⌥⌘⇠

Control-Option-Command-Left Arrow

Jump to Selection

⌘J

Command-J

Jump to Definition

⇧⌘D

Shift-Command-D

Move Focus To Next Area

⌥⌘K

Option-Command-K

Move Focus To Previous Area

⌥⇧⌘K

Option-Shift-Command-K

Interface Builder

Jump to Next Object with Clipped Content


Jump to Previous Object with Clipped Content


Source editor

Jump to Counterpart

⌃⌘⇡

Control-Command-Up Arrow

Jump To…

⇧⌘J

Shift-Command-J

Jump to Next Placeholder

⌃/

Control-/

Jump to Previous Placeholder

⌃?

Control-?

Jump to Next Issue

⌘'

Command-'

Jump and Fix Next Issue

⌃⌘'

Control-Command-'

Jump to Previous Issue

⌘"

Command-"

Jump and Fix Previous Issue

⌃⌘"

Control-Command-"

Table 1-6  Editor menu command shortcuts

Context

Command

Key Binding

Shortcut

Data model

Show Grid


Show Page Breaks


Add Entity


Add Fetch Request


Add Configuration


Add Attribute

⌃⌘A

Control-Command-A

Add Fetched Property


Add Relationship

⌃⌘R

Control-Command-R

Import…


Create NSManagedObject subclass…


Documentation

Explore Documentation


Search Documentation


Documentation Bookmarks


Zoom In


Zoom Out


Actual Size


Add Bookmark


History


Interface Builder

Show Bounds Rectangles


Show Layout Rectangles


Snap to Guides


Live Autoresizing


Align Left Edges

⌘[

Command-[

Align Right Edges

⌘]

Command-]

Align Top Edges


Align Bottom Edges


Align Horizontal Centers


Align Vertical Centers


Align Baselines


Align Horizontal Center In Container


Align Vertical Center In Container


Send to Front


Send to Back


Send Forward


Send Backward


Unembed


Size to Fit

⌘=

Command-=

Add Horizontal Guide

⌘_

Command-_

Add Vertical Guide

⌘|

Command-|

Reveal in Document Structure


Simulate Document


PDF

Automatically Resize


Zoom In


Zoom Out


Actual Size


Single Page


Single Page Continuous


Two Pages


Two Pages Continuous


Next Page

⌥⌘⇣

Option-Command-Down Arrow

Previous Page

⌥⌘⇡

Option-Command-Up Arrow

RTF

Insert Page Break


Insert Line Break


Insert Paragraph Break


Show Ruler


Add Link…


Allow Hyphenation


Scripting definition

Make Text Bigger

⌘+

Command-+

Make Text Smaller

⌘-

Command--

Source code

Show Completions

⌃\

Control-\

Edit All in Scope

⌃⌘E

Control-Command-E

Fix All in Scope

⌃⌘F

Control-Command-F

Show Issue


Show All Issues

⌃⌘M

Control-Command-M

All Issues


Errors Only


Balance Delimiter


Re-Indent


Shift Right

⌘]

Command-]

Shift Left

⌘[

Command-[

Move Line Up

⌥⌘[

Option-Command-[

Move Line Down

⌥⌘]

Option-Command-]

Comment Selection

⌘/

Command-/

Fold

⌥⌘⇠

Option-Command-Left Arrow

Unfold

⌥⌘⇢

Option-Command-Right Arrow

Unfold All


Fold Methods & Functions

⌥⇧⌘⇠

Option-Shift-Command-Left Arrow

Unfold Methods & Functions

⌥⇧⌘⇢

Option-Shift-Command-Right Arrow

Fold Comment Blocks

⌃⇧⌘⇠

Control-Shift-Command-Left Arrow

Unfold Comment Blocks

⌃⇧⌘⇢

Control-Shift-Command-Right Arrow

Focus Follows Selection


Show Invisibles


Xcode project

Add Target…


Hex editor

Overwrite Mode

⌥⇧⌘O

Option-Shift-Command-O

Table 1-7  Product menu command shortcuts

Command

Variant

Key Binding

Shortcut

Run


⌘R

Command-R

Run…1

⌥⌘R

Option-Command-R

Test


⌘T

Command-T

Test…1

⌥⌘T

Option-Command-T

Profile


⌘I

Command-I

Profile…1

⌥⌘I

Option-Command-I

Analyze


⌃⌘B

Control-Command-B

Analyze…1

⌃⌥⌘B

Control-Option-Command-B

Archive


Build For

Build For Running

⇧⌘R

Shift-Command-R

Build For Testing

⇧⌘U

Shift-Command-U

Build for Profiling

⇧⌘I

Shift-Command-I

Build for Archiving


Perform Action

Run Without Building

⌃⌘R

Control-Command-R

Test Without Building

⌃⌘U

Control-Command-U

Profile Without Building

⌃⌘I

Control-Command-I

Build


⌘B

Command-B

Clean


⇧⌘K

Shift-Command-K

Clean Build Folder…

⌥⇧⌘K

Option-Shift-Command-K

Stop


⌘.

Command-.

Debug

Pause

⌃⌘Y

Control-Command-Y

Step Into

F7

Function 7

Step Over

F6

Function 6

Step Out

F8

Function 8

Step Into Thread

⌃⇧F7

Control-Shift-Function 7

Step Into Instruction

⌃F7

Control-Command-Function 7

Step Over Thread

⌃⇧F6

Control-Shift-Function 6

Step Over Instruction

⌃F6

Control-Function 6

Add Breakpoint at Current Line

⌘\

Command-\

Activate Breakpoints

Deactivate Breakpoints

⌘Y

Command-Y

Shared Libraries...


Clear Console

⌘K

Command-K

Window Behavior

Normal


Xcode Behind


Xcode In Front


Edit Scheme…


⌘<

Command-Less Than

New Scheme…


Manage Schemes…


1 Opens the scheme editing dialog for editing prior to performing the chosen command.

Table 1-8  Window menu command shortcuts

Command

Key Binding

Shortcut

Minimize

⌘M

Command-M

Zoom


Select Next Tab

⌘}

Command-}

Select Previous Tab

⌘{

Command-{

Welcome to Xcode

⇧⌘1

Shift-Command-1

Organizer

⇧⌘2

Shift-Command-2

Bring All to Front


Table 1-9  Help menu command shortcuts

Command

Key Binding

Shortcut

Xcode Help


Xcode 4 Transition Guide


Quick Help

⌃⌘?

Control-Command-?

Search Documentation for Selected Text

⌃⌥⌘/

Control-Option-Command-/

Developer Documentation

⌥⌘?

Option-Command-?


반응형

'IPHONE' 카테고리의 다른 글

ios Localization.  (0) 2013.10.11
@property의 어트리뷰트 설정.  (0) 2013.10.08
아카이브에 저장하고 불러 오기 샘플 코드.  (0) 2013.09.04
Local Notification  (0) 2013.07.10
사운드  (0) 2013.07.04
Posted by 컴스터
,
반응형

- (void)viewDidLoad

{

    [super viewDidLoad];

// Do any additional setup after loading the view, typically from a nib.

    NSFileManager *filemgr;

    NSString *docsDir;

    NSArray *dirPaths;


    filemgr = [NSFileManager defaultManager];


    // documents 디렉터리 얻기.

    dirPaths = NSSearchPathForDirectoriesInDomains(NSDocumentDirectory, NSUserDomainMask, YES);


    docsDir = dirPaths[0];


    // 데이터 파일에 대한 경로 구축.(.h 파일에 @property (strong, nonatomic) NSString *dataFilePath; 정의 되어 있어야함).

    _dataFilePath = [[NSString alloc] initWithString:[docsDir stringByAppendingPathComponent:@"data.archive"]];


    // 파일이 이미 있는지 검사.

    if ([filemgr fileExistsAtPath:_dataFilePath])

    {

        NSMutableArray *dataArray;


        // 아카이브에서 데이터 가져오기.

        dataArray = [NSKeyedUnarchiver unarchiveObjectWithFile:_dataFilePath];


        // 이름 텍스트 필드.

        _name.text = dataArray[0];

        // 주소 텍스트 필드.

        _address.text = dataArray[1];

        // 전화 텍스트 필드.

        _phone.text = dataArray[2];

    }

}


// 저장 버튼에 바인딩한 메소드.

- (IBAction)saveData:(id)sender {


    NSMutableArray *contactArray;


    contactArray = [[NSMutableArray alloc] init];

    // 이름 텍스트 필드.

    [contactArray addObject:self.name.text];

    // 주소 텍스트 필드.

    [contactArray addObject:self.address.text];

    // 전화 텍스트 필드.

    [contactArray addObject:self.phone.text];


    // 아카이브에 저장하기.

    [NSKeyedArchiver archiveRootObject:contactArray toFile:_dataFilePath];

}

반응형

'IPHONE' 카테고리의 다른 글

@property의 어트리뷰트 설정.  (0) 2013.10.08
XCode4 단축키.  (0) 2013.09.12
Local Notification  (0) 2013.07.10
사운드  (0) 2013.07.04
UIActionSheet 사용하기.  (0) 2013.05.30
Posted by 컴스터
,

Local Notification

IPHONE 2013. 7. 10. 15:34
반응형

UIApplication *app = [UIApplication sharedApplication];
   
    NSArray *scheduled = [app scheduledLocalNotifications];
    if (scheduled.count)
    {
        [app cancelAllLocalNotifications];
    }
   
    UILocalNotification *alarm = [[UILocalNotification alloc] init];
    if (alarm)
    {
        alarm.fireDate = [NSDate dateWithTimeIntervalSinceNow:5.0f];
        alarm.timeZone = [NSTimeZone defaultTimeZone];
        alarm.repeatInterval = 0;
        alarm.alertBody = @"Five Seconds Have Passed";
        [app scheduleLocalNotification:alarm];      
       
    }

반응형

'IPHONE' 카테고리의 다른 글

XCode4 단축키.  (0) 2013.09.12
아카이브에 저장하고 불러 오기 샘플 코드.  (0) 2013.09.04
사운드  (0) 2013.07.04
UIActionSheet 사용하기.  (0) 2013.05.30
UIViewAlert 사용하기.  (0) 2013.05.30
Posted by 컴스터
,

사운드

IPHONE 2013. 7. 4. 11:15
반응형

#import <AudioToolbox/AudioToolbox.h>


- (void)playClick
{
    NSString *sndpath = [[NSBundle mainBundle] pathForResource:@"click" ofType:@"wav"];
    CFURLRef baseURL = (CFURLRef)CFBridgingRetain([NSURL fileURLWithPath:sndpath]);
   
    SystemSoundID sysSound;
    AudioServicesCreateSystemSoundID(baseURL, &sysSound);
    CFRelease(baseURL);
   
    AudioServicesAddSystemSoundCompletion(sysSound, NULL, NULL, _systemSoundDidComplete, NULL);

    AudioServicesPlaySystemSound(sysSound);
}


void _systemSoundDidComplete(SystemSoundID ssID, void *clientData)
{
    AudioServicesDisposeSystemSoundID(ssID);
}

반응형

'IPHONE' 카테고리의 다른 글

아카이브에 저장하고 불러 오기 샘플 코드.  (0) 2013.09.04
Local Notification  (0) 2013.07.10
UIActionSheet 사용하기.  (0) 2013.05.30
UIViewAlert 사용하기.  (0) 2013.05.30
네비게이션바, 툴바 보이게하기.  (0) 2013.05.20
Posted by 컴스터
,

UIActionSheet 사용하기.

IPHONE 2013. 5. 30. 11:32
반응형

UIActionSheet *sheet = [[UIActionSheet alloc] initWithTitle:nil
                                                       delegate:self
                                              cancelButtonTitle:@"취소"
                                         destructiveButtonTitle:nil
                                              otherButtonTitles:@"액션1", @"액션2", nil];
   
    [sheet showInView:self.view];


// *********** ActionSheet 버튼 클릭시 실행하는 메소드. ***************************************

- (void)actionSheet:(UIActionSheet *)actionSheet clickedButtonAtIndex:(NSInteger)buttonIndex
{
    if (buttonIndex == actionSheet.cancelButtonIndex)
    {
        NSLog(@"취소 버튼 클릭");
    }
}

반응형

'IPHONE' 카테고리의 다른 글

Local Notification  (0) 2013.07.10
사운드  (0) 2013.07.04
UIViewAlert 사용하기.  (0) 2013.05.30
네비게이션바, 툴바 보이게하기.  (0) 2013.05.20
Simulator 에 앱경로 알아 보기.  (0) 2013.05.06
Posted by 컴스터
,

UIViewAlert 사용하기.

IPHONE 2013. 5. 30. 09:25
반응형

UIAlertView *alert = [[UIAlertView alloc] init];
    alert.delegate = self;
    alert.title = @"타이틀입니다.";
    alert.message = @"메세지를 적습니다. ^^";
    [alert addButtonWithTitle:@"아니오"];
    [alert addButtonWithTitle:@"예"];
    alert.cancelButtonIndex = 0;
    [alert show];


// ********************* 버튼 선택에 따른 처리 *******************************************

- (void)alertView:(UIAlertView *)alertView clickedButtonAtIndex:(NSInteger)buttonIndex
{
    // 버튼이 취소버튼인지 비교.
    if (buttonIndex != alertView.cancelButtonIndex)
    {
        // 예 버튼이 눌렸을때.
        UIAlertView *alert = [[UIAlertView alloc] init];
        alert.title = @"참! 잘했어요.";
        alert.message = @"예를 눌렀군요.";
        [alert addButtonWithTitle:@"OK"];
        [alert show];       
    }
   
}

반응형
Posted by 컴스터
,
반응형
- (void)viewWillAppear:(BOOL)animated
{
    [super viewWillAppear:animated];

    // 네비게이션바 보이기.
    [self.navigationController setNavigationBarHidden:NO animated:YES];

    // 툴바 보이기.
    [self.navigationController setToolbarHidden:NO animated:YES];
}


반응형
Posted by 컴스터
,


반응형